My friend Brandon, the genius who runs Turn Point Design helped me design the new float and then cut a half-mold from light foam with his CNC machine. I glassed and finished the foam mold before covering the mold in teflon film and then attached it to a flat panel. From the mold, two halves were made as shown below

Because I wanted to install a radar reflector inside the new float it had to be made out of fiberglass, not carbon. The weight of the float is critical as it lives above the masthead, so I used S-glass cloth for the laminate. S-glass is not very popular because it costs almost as much as carbon yet is not as strong. It is however quite a bit stronger than regular E-glass and it was interesting making (and breaking) sample laminates.

I knew that with thin laminates, vacuum bagging is not necessarily beneficial as it makes the laminate so much thinner. Stiffness is related to thickness, so I hand laminated the parts without bagging.
I was faced with the interesting challenge of how to laminate multiple layers on the mold at one time. It was difficult to make the cloth conform to the shape even with the cloth dry and able to slide around on the mold. It was obvious that putting a dry layer of cloth over wet cloth wouldn't work.


I found from testing that if the mold was warm, multiple layers could be wet through at one time, so the first three layers of cloth were fit to the mold dry as shown above and then saturated in one step as shown below.
This was possible because I was using West System Pro-Set laminating epoxy (which is quite thin) and because the mold was warm when laminating, making the epoxy even thinner. A temporary oven was built to warm the mold and to cure the first three layers before adding the final two layers.
All five layers of cloth and the fill coat were applied in one day to insure good adhesion between the layers.

 To make the laminate stick into the inside corners, the cloth was lifted and a small bead of epoxy thickened with 406 Colloidal Silica (mixed very thick) was syringed into the corner before wetting the cloth out on to the flange area with a brush.

The foam rollers won't spread a thick fill coat evenly, so I used a brush (and some heat from a heat gun) to meter the thickened epoxy evenly over the surface. A roller was then used to make it really even.

The laminate consists of three layers of 5.7 oz S- glass and a layer of 3.7 oz on the inside and outside, making 5 layers total.

Had I been content to have the joining flange on the outside (as was the original float), I could have skipped the next step of making an inward-facing flange.
A plywood flange mold was cut and covered with plastic tape. This mold was clamped to the outside flange as shown.
 Multiple layers of glass were laminated to form an inward-facing flange. The strips of cloth were pre-saturated and placed into the inside corner. This was not a fun part of this project, but necessary because of my limited mold investment.
The perfectly good outer flange was hacked off with a jigsaw and the remainder was trimmed off with a router screwed to a strip of plywood The photo below shows router from underneath.


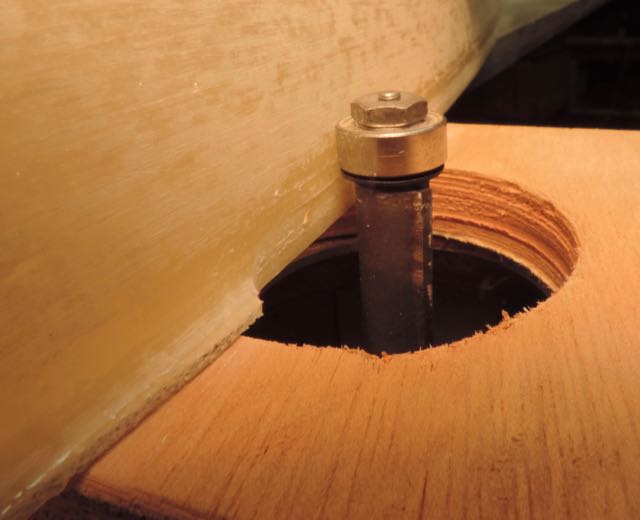
A large router table would have been better suited for this job.
The beauty of using the router here is that the edge is easily and accurately trimmed square to the centerline making alignment of the two halves much easier.
The mast head float rotates on an axle protruding from the masthead. The float has a tube running through it that the ball bearing races fit into.
I had to make a light fiberglass tube with a 1 5/8" ID. The bearing races are 1 5/8" OD.
My new favorite tube making method is to lightly wet cloth out on plastic taped tightly to the bench and roll the cloth tightly onto the waxed mandril. The cloth can be wrapped very tightly because the cloth on the plastic can be pulled against while rolling.
The mandril and tube are then "cooked" using a small heater blowing warm air into a box, starting while the epoxy is still wet. The finished tube should slide right off the mandril after cooling, but only if the cook was hot enough and long enough and if the metal used for the mandril has a high thermal expansion rate. Aluminum is great for this purpose, copper (shown) worked well, steel is not so good. Putting the mandril and tube in the freezer can also help with removal.


With the two halves of the float taped tightly together, a hole saw was used to cut the holes for the tube.
Epoxy had been piled into the inside corners to allow the pilot bit to stay centered while drilling.
 The tube fits snug in the hole which will help with the next steps. The brown ring inside the tube is a stop for the bearings.
Here the tube has been wrapped in plastic tape and hot-melt glued in it's place. The scrap plywood flange molds are also taped on their lower surfaces.


This is what it looked like from underneath with about half of the laminate in place dry.
These layers of glass were placed with the fibers at 0-90 and + - 45 degrees and are shown dry because the laminate wasn't visible after saturation.
The area was primed and beads of thickened epoxy were squeezed into the inside corners before applying the laminate.

The tube and flange molds have been moved to the other half for the same laminating process. The same, except there's no plastic tape on the tube this time. Better hope it's in the right place.

The radar reflector (a Davis emergency reflector that weighs 7.5 oz.) was bonded in place with small blocks of foam glued to the skin and reflector with G-flex.

Tiny little blocks were hot-melt glued around around the edges to align the two halves when gluing. After careful preparation, the two halves were bonded together with G-Flex.


The taping was peel plyed and later faired in with a squeegee and then fill coated.

The fairing was done with flexible sanding blocks of different stiffnesses. These were made from thin plywood of different thicknesses (very thin for fairing around the nose.
The tail fin was made from 1/4" foam with carbon skins. It was filleted and taped in place.
The whole thing was given a thin coat of 105 / 207 as a primer for painting.


Blimpy weighs almost 4 1/2 pounds. The "dirigible" that blimpy replaces weighs just over 7 pounds.
With a bigger investment, the weight could be reduced, but this one seems light and it bounces really well when dropped on the floor. The old float rotates on a thin walled stainless shaft, this one uses a carbon shaft made by ICE. The new shaft is quite a piece of work and I don't worry about breaking it.

Meanwhile, the mast is very close to being finished. It has been quite a project. More complicated (of course) than I had imagined, but still fun. I'll post about that next....
Buen trabajo
ReplyDeleteYour Málaga Airport Transfers are in the best hands!
ReplyDeleteOur vehicles and drivers based near Málaga airport arrivals are fully insured as dictated transport laws and of course also having passenger insurance mandatory.
s-2 glass is stronger then carbon fiber, it isn't as rigid however or as flexible.
ReplyDeleteLots to like. Thanks for post.
ReplyDeletefabulous
ReplyDelete