Designing the new rig and sail plan was done with help and advice from a number of people and took some time to accomplish. I started in the Fall working on things that weren't likely to change with changes in the rig design.
The spreaders were pretty easy to determine. They are short because they need to fit inside the fixed shrouds and they need to fit the mast section that I will be using.
I had thought to make hollow carbon spreaders, but instead shaped Sitka Spruce blanks and covered them with woven carbon.
My goal with the new rig is to make it as light as possible and to make it as aerodynamically
clean as possible. These spreaders will operate at high angles of attack because the boat heels so much, so I wanted a short chord length for as much of the span as possible.


The Spruce blanks were shaped with a grinder, block plane, and sanding blocks. The trailing edge had a solid epoxy fill applied before final shaping.


After more shaping, the ends had solid epoxy tips added before the final shaping shown below.


After trimming the edges and sanding, the spreaders were cut away from the center of the blank. Notches were cut in the tips for the diamond wires to run through and holes drilled for seizing.
It shouldn't be long before the spreaders are bonded and taped onto the mast.


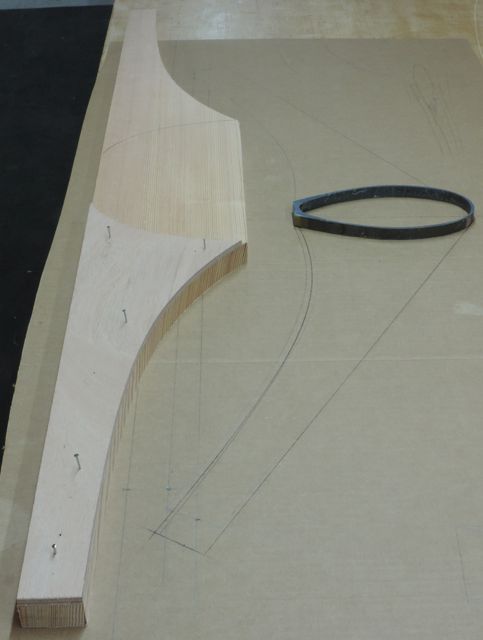
So I built cored panels similar to the top surface of the boxes.
For storage, there will be mesh fabric bags underneath the panels supported by tent pole-like fiberglass tubes.

Only the materials shown in this photo were discarded after making the panels.

A light coat of epoxy was applied to the under side of the plywood first to prevent grain tear-out when removing the mold frames
To use the lower skin as a mold, it had to be completely airtight, so I applied two coats of epoxy, the first being squeegeed into the grain. The second coat was healthy and thorough and was lightly sanded after curing.
The core and top skin are shown here, the core being 5 pound foam (of two different colors).
The core and the top skin have corresponding holes to let air and extra epoxy pass into the bleed stack.

I was able to stretch the vacuum bag tight enough to pull the panel close to the mold surface before turning on the pump, keeping the peel ply and vacuum bag from creeping under the panel edges.


The panel was easily removed from the mold frames and cut into the final shapes using a template, skill saw, and jigsaw.


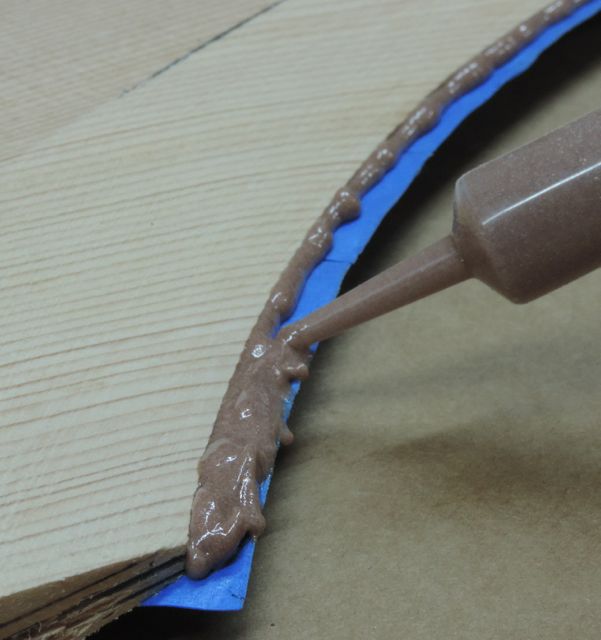
Carbon angles were bonded and taped to the aft edges of the platforms. These angles will be bolted to plates that attach to the traveller.

Carbon angle will also be used to attach the forward ends to the cockpit area.
I needed a lot of angle, so I made a simple mold from plywood with a small bondo fillet in the corner and covered the mold with plastic tape.
10 layers of 400 gsm (almost 12 oz.) woven carbon produced a laminate 4 mm (almost 3/16") thick.
It's easy to plan thickness with vacuum bagged carbon; each 100 gsm of laminate equals .1 millimeter of thickness.

A new mast head float is underway. It's slightly smaller than the old one and shaped differently. I had a mold machined from styrofoam which was faired, glassed, fill coated, faired again, and then gloss coated.
More on this later...


The mast is an Omohundro section built for the F-25. I bought two of them ages ago that were discounted seconds because there were flaws in the bolt rope track flanges. I built a rig from one of them at least 15 years ago and have been hanging on to the other ever since. The section is heavier than necessary, but I'll be able to have less rigging than the stock G-32 and the rig should still be lighter, even though it's a bit longer. The bare tube shown weighs 48 pounds, the G-32 rig weighs close to 75 pounds.

 k
k
The bottom end of the mast has about a third of the trailing edge cut away to make room for the roller furling universal joint, which will be covered later in the blog. Re-building this part of the mast was complex. This photo shows lots of laminate being bagged into the leading edge to reinforce for holes that will go there.

To re-build the lower section of the mast, I had to laminate inside a very small space. I made a thin plywood pattern that covered the area and then chopped it up into sections about 4" long (after plastic taping the pattern). Patches of wet-out carbon were applied, one section at a time. These patches were overlapping, lapped down onto the mast walls and were located by draping them over a stir stick and then pushed carefully into place by hand.

This part of the laminating looked pretty good for having done it without being able to see what I was doing.

A piece of pre-preg carbon plate (mostly unidirectional) was then bonded to the mast as shown.

After rounding the edges, a lot of laminate was vacuum bagged over the area using Pro-Set epoxy. This laminating was done in two steps to avoid wrinkling and has fibers running at 0 degrees, 0 - 90, and + - 45 degrees. Note that the lower two inches of the mast will be cut off after this laminating.

The next step was bonding on the new bolt rope track. I bought extruded polycarbonate track from Ted Van Dusen, who runs one of the first carbon spar companies; Composite Engineering. Ted designed this bolt rope track and it has been used it on many masts.
The first step was to get the track glued on, which would have been easy if I didn't care if it was straight or not. The photo below shows a little jig holding a knife blade that is cutting the green masking tape to the width of the track. This green 3-M tape adheres really well if pressed down hard.

I cut a long strip of wood angled as shown and then cut the strip into little blocks. With the track taped in place using the green tape as a centering guide, the little blocks were glued to the tape every 6" with a little dab of hot-melt glue.

The track was glued on to the mast with West System G-flex, a toughened epoxy that seemed to stick to the polycarbonate track really well (after sanding). Plexus adhesive is usually used for attaching plastic track, but I wanted to use G-flex for the longer working time and because I will be wrapping carbon over the track, making the bond less critical. Plexus fumes are horrible too.

I wanted to vacuum bag carbon fiber over the whole length of the track to make it reliable, but had to do something to keep the track from pinching under pressure and to keep epoxy from entering the track. A roughly 1/2" x 1/8" stick was milled, covered with plastic tape, and inserted in the track as shown. It protrudes slightly for reasons that will become apparent.

Because G-flex sticks so well to this plastic, the track was primed with G-Flex immediately before applying the wet carbon. This was a thin coat applied with a stiff brush.

The carbon strips were wet out on plastic taped to the bench (using Pro-Set epoxy) and then then applied to the mast. The strips were cut from the end of the roll of 5.7 oz carbon, so were a manageable length. I used three layers for the top half of the mast and two below that, except that both ends had four layers applied.

I forgot to take photos with the bag on, but this is what it looked like after the bag came off. There were vacuum lines coming in from both ends and plenty of breather to allow air flow.

Pushing carbon into inside corners is always challenging because the peel ply and perforated film are not stretchy, which means that they need to be pulled (along with the carbon) toward the inside corner while under vacuum pressure. I used two short lengths of plywood with the ends cut at angles and rounded to push the laminate into the corners from both sides at once as soon as the vacuum pressure started.

After post-curing the laminate with heat blankets, the laminate was block sanded away from the aft face, revealing the spacer. Then the spacer was pried up as shown.


I'm much farther along with all this stuff now, but I'll have to catch up with the blog later. I'll do my best to do blog entries more often. This kind of work is fun for me and the really fun parts are still to come; the new mast head float, carbon hardware, etc...
We still haven't found the right name for the boat. Any ideas?
Happy new year!
We still haven't found the right name for the boat. Any ideas?
Happy new year!
Wow, nice job!
ReplyDeleteLove the blog, so many great ideas. It'll be fun to hear about how the new mast changes the sailing characteristics.
ReplyDeleteBob
This comment has been removed by the author.
ReplyDeleteRussell,
ReplyDeleteThanks so much for blogging about your work. It's incredibly informative; a rare opportunity for an amateur to watch a skilled builder work.
I recently glued up my own set of curved akas. Not sure how I would have done that without your post about it. Still need to figure out how to attach the darn things...
Keep it up!