The bows on my G-32 had two issues that I wanted to remedy; they were misaligned and they were delicate.
The misalignment wouldn't bother anyone but me, but the rest of the boat is so beautifully fair and I didn't want to look at crooked stems.
The delicate part probably wouldn't bother anyone not sailing in the North West where floating logs are a menace, but I do sail here and this boat has plumb stems, so there's little chance of riding over a log.
In the G-32, the core stops about 2' back from the stems and it's solid laminate foreword of that, which is all good, but in my boat the laminating must have been done on a friday, because it was very thin in some areas and not thin in others.
In the builder's defense, it would have been very difficult working in the stem areas of these molds.
So, I wanted the stems to be stronger and I wanted them straighter and I got both with the help of wood, carbon, glass & epoxy.
From a cardboard template I cut hard mahogany caps and glued them to the front edge of the stems
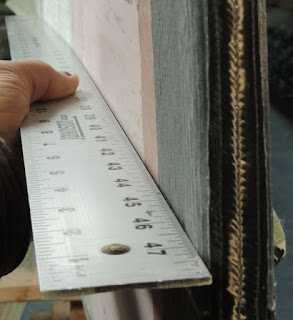
A long and stiff sanding block (with 40 grit paper at one end only) was used to bevel the stem caps to the plane of the hull surfaces.
This step was where the straightening of the stems happened. Compare to the photo above.
The new stem is obviously thicker than the old, so thickened epoxy was applied to fair the thicker stem into the rest of the hull.
Yes, this added weight, (I used over a quart of epoxy for fairing), but the filler had a benefit: A layer of glass cloth was applied over the whole area as a final step and that, with the filler acting as a core, made these areas of the hull very stiff.
Because the areas being faired were still flexible, the filler had to be applied carefully. Sanding a flexible area with a longboard doesn't really work. The flexible parts yield and the firm part's don't, so only the firm areas would be abraded and unfairness would result.

Lot's of thickened epoxy was applied and then was carefully tooled or "swept" with a very stiff and sharp edged tool.
The tool in this case is a strip of cored panel that had one edge cut to 45 degrees on the table saw.
A straight and sharp edge is necessary and when using a strip of cored panel, one of the skins becomes the sharp edge.
I swept all areas a second time. The second pass is easier as there's less volume and the epoxy can be mixed thinner.
I did both on the same day for a good bond.

I did a bit of sanding and shaping, then scribed a centerline on the front edge of the stem cap.
The stems were 5 sided and then rounded as shown using a block plane and both stiff and flexible sanding blocks.


I wanted these stems to be strong. Did I say that?
A good whack of carbon seemed like a good idea.
The problem with laminating a bunch of fiber around the stems is thickness buildup, which means applying more filler to the sides.
To get lots of fiber without lots of thickness we had to vacuum bag the carbon.
The carbon shown is 9 oz (300 gsm) biaxial, which was quite conformable. We applied one layer as shown and another 4" wide strip that can be seen in photos below.
The bleed stack (that's what it's called) consists of a layer of peel ply, a layer of perforated film, and two layers of breather (fuzzy blanket material).
These layers were lightly glued together with spray adhesive in a big sheet and the parts shown were pre-cut from cardboard templates and placed on the wet carbon.
The Vacuum bags were large rectangles with mastic applied to all 4 edges and pre-applied to the boat on one edge only. When the time came, I folded the bag around the stem, attached the other edge and then did the top and bottom edges. The corners of the bag were folded back as shown to allow working out potential wrinkles.
As you can see, nothing but the bag went over the sharp edges of the stem.This allowed visual inspection for wrinkles, where wrinkles would form. As vacuum Pressure was building, I pushed back hard on the bag as shown to move the laminate away and tighten the laminate around the corner.
The laminate looked fine when the bags came off. No wrinkles and little thickness buildup.

The thickness buildup can be seen here and the
remedy (another pass with the sharp-edged stiff & straight tool) can be seen below.
Thickness of vacuum bagged laminate can be figured quite easily if you speak metric.
Fot every 100 gsm (grams per square meter) of fabric, there is .1 millimeter of thickness.
I used 2 layers of 300 gsm fabric and had .6 of one millimeter of thickness buildup (not very much).
5.7 ounce (200 gsm) is the most commonly used carbon cloth. It takes 5 layers to make 1 millimeter of thickness.


The reason the carbon laminate extends so far onto the upper part of the hulls is that we wanted to replace the stainless U-bolts that were in this location with fiberglass tubes that run right through the hull. The holes were cut with a hole saw and the tubes were carefully bonded in with epoxy.

After a bit more sanding, the foreward 26" of the hulls are glassed with 8.9 oz "Rutan" cloth. We did this one side at a time, (the opposite side done the following day) wrapping the glass around the stems each time.
The glass cloth pieces were rolled onto a length of cardboard tube when flat on the bench, which allowed rolling them onto the wet (with epoxy) vertical hull sides in a controlled, wrinkle-free way.

The excess cloth was trimmed with scissors to allow just enough cloth to wrap around the sharp edges.
This cloth was wet out around the edges (with the roller) and then held in place with small squares of light peel ply as shown below.

For this to work, a light film of epoxy was rolled onto the opposite side near the edges for the peel ply to stick into and the peel ply pieces are stretched around the corners, making the glass behave like it wouldn't otherwise and making sanding the edges later a breeze.
I also added strips of peel ply to the aft edges to smooth the cloth into the the hull.
Yes, I had to sweep the whole thing one more time with the long straight thing.
I was able to do this the same day, so this was like the fill coat and fairing all in one. I always like for things to be fair without too much sanding... Don't know why.
The G-32 has a copper/epoxy bottom that was applied in the molds. Under the wing deck where there's no sun exposure, this copper bottom is still shiny and smooth. Everywhere else it is oxidized and green, but a light sanding and polishing makes it look like a shiny penny again.
We had to re apply copper/epoxy to the bow areas, which was easy, just mix the copper powder into the epoxy (lots of it) and roll it on. I warmed the areas with a heat gun while I was rolling and then tipped with a wide foam brush.
I don't know where to buy this stuff, but I asked Tom Pawlak, my favorite tech advisor at Gougeon and he sent me a small can that had been gathering dust on his shelf for decades.
The "Rutan" cloth we mentioned above is a type we use a lot of and sell with our kits.
Hexcel 7725 is a glass cloth developed with the help of Burt Rutan for his composite aircraft. The fibers are very fine and lay relatively flat (2x2 twill weave).
While it is a bit different to work with than regular cloth, this stuff is very strong for it's weight and thickness and takes less epoxy than comparable weights of cloth.
There is a unidirectional version as well (7715) and both are available in cut lengths from Aircraft Spruce & specialty.


