I Finally own a G-32
I have been intrigued with the -32 for many years and when our friend
Chuck Hosmer told me he had one I asked him to keep me in mind if he
ever wanted to sell it. Chuck ended up waiting a couple of years for me
to sell our "big" boat, but just a week after that event, we sailed the
32 across Puget sound from Whidby island, the boat's lifetime home, to
Port Townsend.
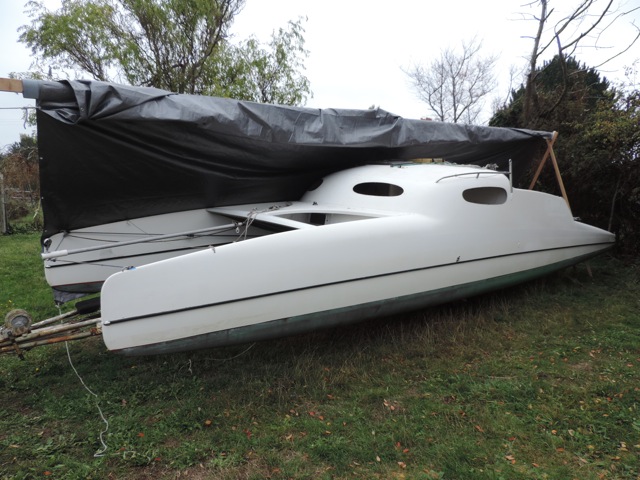
I parked the boat in front of my shop and built a tent over it to do a
bit of gelcoat repair and a few other things, but made the big mistake
of removing the rubber channel that was bonded around the hulls at the
hull to deck joint. Loads of gel coat came popping off with the rubber
and my excitement about our new cruising boat turned into moderate
despair at the project I had to face.
I knew that gelcoat adhesion was a big issue with the G-32, but.....
Getting the boat in my shop was a mission. I had to find a place to put
the catamaran motorboat I was building and move many other things out of
the shop. Then I had to cut part of the wall out, make a ramp, and ask a
couple of friends to help. I used the boat's mainsheet tackle to drag
the boat backwards up the ramp, cranking the trailer all the way up to
clear the sterns and then all the way down to clear the ceiling.

This shop is used to manufacture and pack boat kits, our business is PT
Watercraft and we only sell kits for 3 boats, but the shop is usually
just big enough to operate out of.
One of the first things I realized after putting the boat in the shop is
how long it is. Our business is still operating, but we spend a lot of
time walking around the boat.

The first couple of weeks (part time) was spent removing hardware. This
was another mission. How many G-32 owners know that all the hardware on
(and aft of) the back crossarm was installed before the two halves were
joined? There are nuts where no human hand should ever go or eye should
ever see.

I cut a hole in the forward (cored) face of the aft x-arm of the size
shown (a small Beckson port) to reach in to the nuts of the winch and
other hardware on both faces of the beam.
Positioning this hole closer to centerline may have made the job easier,
but the beam is very narrow and hard to fit a hand into and there are
lots of meathooks (sharp things) present.
I ended up getting the electrical outlet off the aft face and using that
as a viewing port to chisel the epoxy off of the winch nuts so that a
wrench could fit the nuts.
The only way I was going to consider
gel coat removal and re-finishing this boat was to remove all the
hardware from the entire outside surface of the boat, except for the
tubular shroud chainplates, which are not removable.
I have been using the word mission,
but I want to make it clear that removing the hardware was not at all
easy. Installing hardware with epoxy is a really good way to go, but
removal later is hard. I used a cordless impact driver and a torch and
still broke bits and stripped slots. I had to cut new slots in screw
heads and even drill all the way around some fasteners to remove them after breaking their heads off.
The hardware in this photo was
removed by cutting another 4 1/2" hole (small Beckson port) in the
middle of the lighter colored horizontal surface in this photo. These
ports will be useful for bailing and inspecting the hull area aft of the
ballast tanks.
Looking down at the mast step and companionway.
The mast step fasteners mostly broke off because of corrosion
between the aluminum and the stainless fasteners. Heating the fasteners
with a torch didn't seem to help much. Had a similar issue with
removing the aluminum jib tracks.
Heating was useful for removing many fasteners. I used a small torch and different sized washers to use as heat shields
Lots of this hardware will go back on after re-finishing, but some will be replaced with new hardware and instruments.

Window Flanges & learning how to remove gelcoat...
It seems like there were more than a few variations on the G-32 windows, but ours came with this style. I thought I could improve on the aesthetics, but after trying lots of different shapes I decided to just clean up what was already there.
I was not going to use the automotive style rubber channel to install new windows as it is ugly, leaky, and heavy. After molding flanges for flush mounted nuts-and-bolts windows I can really see the logic behind the automotive channel as the molded flanges are a lot of work.
This is what the flanges for the flush mounted windows look like.
Surface mounted nuts & bolts windows would have been a great option, except that the windows are located in areas with lots of compound curvature so the window edges would not have laid flat to the cabin surfaces. The molded flanges are flat in the up & down direction.
These flanges were a bit of a process. I took photos of every step and I'll abbreviate it just a bit, but there were lots of steps involved and it's hardly worth showing the process without showing all of it.
I started by making accurate templates of the window shapes I wanted.
Here the side window shape is being being made symmetrical above & below using a half template and a top bearing flush-cutting bit in a router table.
I changed the front window shapes just a bit by flattening out the curve of the top edge and filling in just a bit on on the bottom edge.
Because the windows are leaned back as well as curved around the cabin front, it looks like the the boat has raised eyebrows, so I made the front windows symmetrical end to end, but not above & below. I made the final template using a half template for both ends (90 degrees different from the side windows).
I used the templates to mark and jigsaw-cut female plywood templates that were clamped over the openings to allow router cutting a clean opening that was slightly larger than the male templates.
A top bearing, flush cutting bit (the most dangerous bit from experience) was used to trim the openings back to the template profile. This was a loud and dusty job and a few old router bits were toasted on four windows.
The core and inner skin were trimmed back about 3/4" with a slot-cutting router bit on the side windows only (the front widows are in the heavily curved area without a core).
The thin layer of remaining foam was removed with a sharp chisel and sandpaper.
On the router table I made exact copies of the window templates as shown to make molds or plants for the window flanges. Skip ahead to see how these will be used.
Shown are two layers of plywood being trimmed at once by the router bit to the exact profile of the template.
I used 4mm plywood for these molds, a little bit thinner than the windows will be, but it's what I had and the outer edges of the windows can be lightly chamfered before installation.
I fine sanded and coated these panels twice, sanding between, and taking special care with the edges.
The panels were then fine sanded again and given an abrasive pad scrub before carefully waxing them a few times (on one side and the edges only).
A bunch of straight sticks were milled and glued onto the side that wasn't waxed with hot-melt glue.
I use a fully heated glue gun and push hard for a few seconds so that the sticks lay flat to the panels.
The sticks hold the outside face of the panels flush with the outside face of the cabin. The gelcoat was stripped from around the cutouts (as it will all be removed eventually).
The panels were held in place with dabs of hot-melt glue gluing the ends of the sticks to the cabin sides, done a few sticks at a time and held down until the glue hardened.
This is what it looked like on the inside. A line was marked for reference an even distance and well inboard of the finished flange edge before the sticks were glued on.
On the outside, the gaps between the sticks were taped over with masking tape that was carefully pressed down.
A square of 6 oz cloth was cut into strips on the bias for laminating the first layer
The first step in laminating the flanges was to inject a bead of thickened epoxy into the gap between mold and cut-out. The blue masking tape covering the gap (on the outside) is visible in this photo.
I used a small amount of graphite powder mixed in for this and the next steps to make the outside faces of the flanges black.
I brushed on a layer of epoxy thickened with 406 colloidal silica. This will make the first layer of cloth pinhole-free as well as black.
There was still too big a step down in thickness between the mold and the outer skin, so I loaded a ziplock full of more thickened epoxy and squeezed a bead around the edges of the molds.
The layer of bias-cut 6 oz cloth was applied into the wet thickened epoxy and wet-out with un-thickened epoxy and a brush.
The thickness needed for the flanges was made up by laminating multiple layers of 10 oz bias-cut cloth that was applied into wet epoxy as shown and wet with a brush.
The bias-cut strips can be carefully forced around the tight corners and the overlaps can be kept narrow and on the diagonal.
The strips can easily stretch to twice their origonal length when they have been cut on the bias, so careful handling (or cutting the strips wider than needed) is necessary.
I laminated four layers of 10 oz over the first layer of 6 oz.
I then filled the gap between the inner skin and the flange with thickened epoxy and a very large radius fillet stick after the flange had cured and had been sanded..
This photo show the stick and the angle held (shown after clean-up and cure).
After sanding, another two layers of 10 oz cloth (wider strips) were laminated, this time out onto the inner skin of the cabin sides as shown.
On the outside I bashed all the sticks off with a hammer and chiseled away all the hot-melt-glue and then carefully chiseled away any black epoxy that would inhibit mold removal.
The molds were busted out with a hammer from inside. They came out easily.
A sharp scribe was used to mark about 3/4" inboard of the edge for trimming with a jigsaw.
I marked and cut very carefully to avoid having to fair the curved edges much.
This is how the inside looked after a light fill coat and a light sanding.
This is how the front windows looked on the outside after taping and how they looked on the inside before laminating.
I laminated all 6 layers of 10 oz at one time.
Laminating was much easier than on the side windows because I could use a short section of roller on a narrow roller frame to wet out the strips.
Meanwhile, gelcoat removal is finally underway. It's daunting, but in small doses it's kind of gratifying. Like picking scabs, it's hard to stop.
There are multiple other projects underway that will be shown in future posts.


